Haley Bell at Home

  • Recipes
  • Entertaining & Decor
  • Living
  • About

DIY Holiday Gift: Cinnamon & Sugar Spiced Nuts

December 14, 2016 by Haley Bell in DIY, Dessert

With the final countdown to Christmas in full effect, I wanted to share a very simple yet delicious and thoughtful gift idea. Last year one of my friends gifted us with a jar of homemade cinnamon and sugar spiced nuts and they were amazing! So amazing that I had to ask her for the recipe and make them this year to give as gifts. This recipe is not only incredibly easy, but it makes a ton and it also keeps for weeks. Both the recipe and the sources for the packaging are below :) 

The key to this recipe is to make sure to whip the egg whites until they form stiff peaks before folding in the cinnamon and sugar. While they are baking, I found that stirring them every 15 minutes really helps to coat the mixture on the nuts and also prevents it from sticking to the pan. 

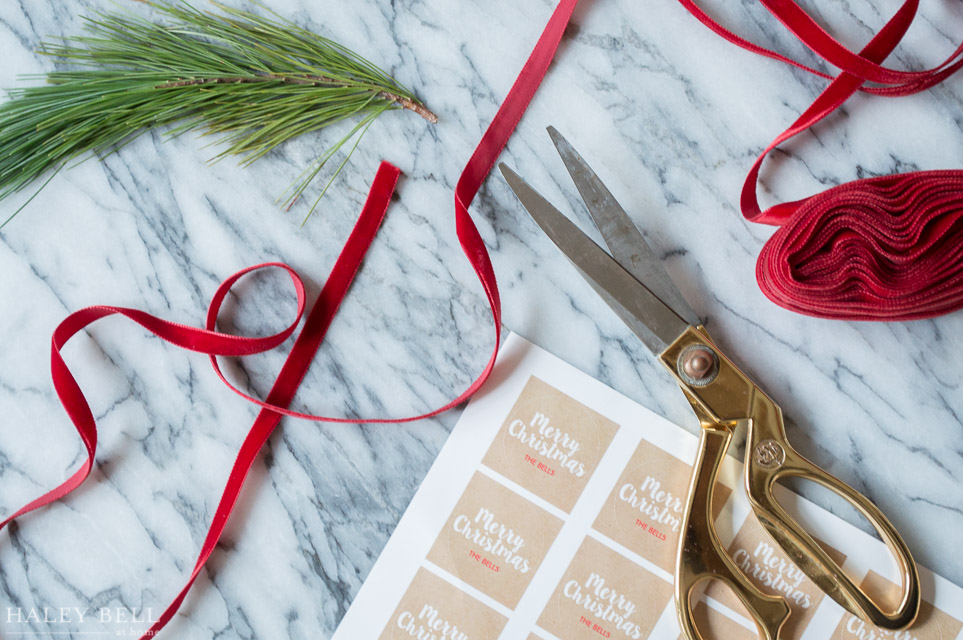
Once the nut mixture has completely cooled from being in the oven, you can either store them in an air tight container until you're ready to gift them or package them up right away. I placed the cinnamon and sugar nuts in some tall jars and tied them with my favorite velvet ribbon. I also had some simple labels made to put on the front of them. I kept the packaging pretty simple since I was making a lot of these for gifts, but you could get as creative as you'd like with these! 


Cinnamon & Sugar Spiced Nuts Recipe

Ingredients:

  • 5 cups pecan halves, unsalted
  • 1 cup whole almonds, unsalted
  • 2 egg whites
  • 2 Tablespoons water
  • 2 cups granulated sugar
  • 2 and 1/2 teaspoons ground cinnamon
  • 2 teaspoons salt

Directions:

  1. Preheat oven to 300F degrees. Line two large baking sheets with parchment paper and spray with non-stick spray; or use a silicone baking mat. Set aside.
  2. Mix pecans and almonds in a large bowl. Set aside.
  3. Using an electric mixer, beat egg whites and water on medium-high speed until stiff peaks form, about 4-5 minutes. Add the sugar, cinnamon, and salt, gently folding until combined.
  4. Pour/spoon sugar mixture over nuts and stir to coat completely. Spread nuts over the baking sheets and bake for 45 minutes, stirring every 15. Allow to cool completely and enjoy. Store nuts at room temperature for a few weeks, covered.

*This recipe comes from this original source. 

December 14, 2016 /Haley Bell
DIY, dessert, cinnamon, sugar, nuts, gift, gift idea, holiday, christmas
DIY, Dessert
Comment

Valentine's Day DIY: Oreo Pops

February 11, 2016 by Haley Bell in DIY, Dessert

Valentine's Day has become one of my favorite holidays not because it involves lots of chocolate, flowers and cards. But because it is a reminder to hug your loved ones a little tighter and tell them you love them. Over the years, my husband and I have established a tradition of celebrating the holiday by making a home cooked meal at home. Sometimes we host others, sometimes it's just the two of us. But it is about the simplicity of coming together as a reminder of what's important. To keep things simple this year, I made these incredibly easy Oreo pops from items I already had in the pantry. I can't wait to surprise my Valentine with them! 

My husband happens to love Oreos, but Oreos dipped in white chocolate? It takes them to a whole new level in minutes! Start out by separating the Oreos in half, trying your best to get the frosting on one side (I had a few failed attempts!). 

Next, take your favorite chocolate candy melts (I chose white chocolate) and melt them in the microwave in 30 second intervals until melted. Just make sure to use a heat proof bowl that is deep enough to dunk the cookie pops into. You could also use a chocolate melting pot. 

Take your favorite lollipop sticks and put a dollop of the melted chocolate on the end to bond the two sides of the cookie together. 

Let the cookies rest on a wire rack to setup. This step is important, otherwise you're going to have cookies falling apart when you go to dunk them in the chocolate (I learned this the hard way). You can also place them in the freezer for a few minutes to speed up the process. 

Now for the fun part! Dunk your cookies into the melted chocolate until fully coated on all sides.

To decorate them, place your favorite sprinkles on a plate to evenly coat both sides of the Oreo pop. You can also keep them in mini bowls to dip half of the cookie. It's fun to create all different patterns and designs!

I also bought some additional icing to glue some of the larger sprinkles directly on the Oreo instead of dipping it in the chocolate. 

The decorating possibilities are endless when it comes to these Oreo pops! Once you have finished decorating them, place them on a piece of wax paper for 20-30 minutes to setup. Then they are ready to eat or package up to give as gifts :)

However you choose to celebrate Valentine's Day, I hope you remind your loved ones just how loved they are! 

Supplies You Will Need:

  • 1 bag of Chocolate candy melts 
  • 1 package of Oreo cookies (double stuffed work the best)
  • Lollipop sticks 
  • Sprinkles 
February 11, 2016 /Haley Bell
oreo, oreos, valentines day, valentine, DIY, chocolate, sprinkles
DIY, Dessert
Comment

A Personalized DIY Gift: For Him

August 12, 2015 by Haley Bell in DIY

For my husband's Birthday this year, I wanted to make something personal for him. He is an extremely creative person and gift giver, and the type who "has everything", so it can be hard to come up with a gift idea for him year after year. 

Every night before we go to bed, my husband asks me to give him a "happy place" to think about so he can fall asleep. For his Birthday gift this year, I decided to put together a book of all of his happy places for him and left room to continually add more places to it. Everyone has happy places that their mind goes to when every day life gets tough and they need a mental escape. This is a fun personalized way to document it.

What you'll need:

  1. Leather photo book
  2. Printed photos ( I printed all 8x10 photos)
  3. Package of photo corners (4 corners per photo)
  4. Scissors
  5. Double sided tape

I started by laying out the photos in the order I wanted them to appear in the book. For each page, I applied 2 pieces of double sided tape and 1 self adhesive photo corner to each corner of the photo (4 per photo). 

I repeated the process for all of the photos, and I left quite a few pages blank towards the end of the book to add more memories to. I typed up a note on the last page, to added another happy place as his additional Birthday gift. He loves sports, so it involves going to see his favorite team play :) This was such a fun way to surprise him! 

One of my favorite parts of giving a gift is pulling together fun wrapping supplies and cards. This year I ordered wrapping paper and a card from Sugar Paper in kraft and white. I used ribbon from my ribbon collection and pulled out similar colors to add texture to the packages. 

BirthdayGift-13.jpg
BirthdayGift-5.jpg
BirthdayGift-14.jpg
BirthdayGift-6.jpg

It was so fun to greet my husband after work with this pile of gifts waiting for him to open and celebrate!

There is nothing like seeing the recipients face light up when they open your gift! I hope this post gives you some inspiration for the next time you need a gift for that person who has it all. 

August 12, 2015 /Haley Bell
DIY, Gift, Him, Photobook
DIY
2 Comments