Haley Bell at Home

  • Recipes
  • Entertaining & Decor
  • Living
  • About
cookiecake-1 (1 of 1).jpg

Easter Cookie Cake

April 08, 2020 by Haley Bell in Dessert

Easter 2020 might not look and feel the way we might have anticipated or hoped it would be, but that doesn’t mean that we can’t still make it special. With the current “shelter in place” that we are experiencing, I have found myself in the kitchen more than ever. And more specifically, baking more than ever. But I have had to be a bit more selective on recipes, based on the items I have in the pantry. This cookie cake uses simple pantry staples yet is SO good! It is the best world of a soft baked cookie in a cake form. If you don’t have these chocolate Cadbury Easter eggs on hand, you can definitely use M&M’s, chocolate chips, or even sprinkles!

cookiecake-6 (1 of 1).jpg
cookiecake-7 (1 of 1).jpg

Growing up, the second the Valentine’s Day candy was cleared out and the Cadbury chocolate eggs were out on the shelves, we always had a bowl of them in our house. So it was an easy choice to add these to this cookie cake. Next time I would also add some mini chocolate chips or cut up some additional Cadbury eggs to add to the batter to even out the cookie dough to chocolate ratio- but that’s just my preference!

cookiecake-10 (1 of 1).jpg

Our Easter plans this year include making Eggs Benedict for breakfast, eating a bite (more like slice) of this cookie cake every time we pass by it in the kitchen, FaceTiming with family and friends, and hopefully getting our veggie garden planted. It sure is the little, and simple things. How are you planning to celebrate Easter this year?


Easter Cookie Cake Recipe

Ingredients:

  • 1 cup butter, softened

  • 3/4 cup sugar

  • 1 cup brown sugar

  • 1 Tbs vanilla

  • 2 eggs, room temperature

  • 3 cup flour

  • 1 tsp baking soda

  • 1/2 tsp baking powder

  • 1/4 tsp salt

  • 1 cup Cadbury eggs (or M&M’s, chocolate chips, etc.)

Instructions:

  1. Preheat oven to 350 degrees and grease a tart/pie dish or baking sheet (I used a tart pan- if you used a pie dish or deeper dish, it will make for longer cook time).

  2. Combine butter, sugar, brown sugar and vanilla. Add eggs until just blended.

  3. Add flour, baking soda, baking powder and salt. Combine.

  4. Scoop dough into baking dish, press until smooth. Bake 11 minutes, remove from oven and press candies into top and return for 5-7 minutes, or until the top of the cookie cake is lightly golden brown.

*This recipe was adapted from this original recipe.

April 08, 2020 /Haley Bell
Easter, recipes, dessert, chocolate, cookie
Dessert
2 Comments
currychickensalad (1 of 1).jpg

Easy Lunch: Curry Chicken Salad for One

January 27, 2020 by Haley Bell

Growing up there was this gourmet grocery store in my hometown called Draeger’s, that had the best chicken salad. They called it “almond chicken salad” and it was a curry chicken salad. My mom, sister and I used to always oder it because it was so good! I was recently craving it, but wanted to recreate it at home with some healthy ingredients.

currychickensalad_4 (1 of 1).jpg

I used my favorite Primal Kitchen avocado oil mayo, but any mayo will do! I also used a mix of green apples, pecans, and celery. Some amazing variations could also include: pineapple, grapes, raisins, almonds, etc. The possibilities are endless! The best part is that this comes together in minutes and makes for the best quick lunch or dinner recipe.

currychickensalad_2 (1 of 1).jpg

I served mine over a bed of greens, but you could obviously enjoy it as a sandwich, wrap or on its own. The next time you are in the need of an easy, delicious and healthy meal, I hope you give this recipe a try!


Curry Chicken Salad Recipe

Ingredients:

  • 1 cooked chicken breast, diced (I used rotisserie chicken)

  • 1-2 Tbs. mayonaise, depending on how much you like

  • 1 tsp. Dijon mustard

  • Fresh lemon juice, to taste (don’t skip this ingredient)

  • 1/4 green apple, diced

  • 1 stalk of celery, diced

  • Pecans, unsalted

  • 1 stalk green onions, diced (optional)

  • 1-1 1/2 tsp. yellow curry powder, depending on your preference

  • Mixed greens for serving

  • Salt and pepper to taste

Directions:

  1. Combine the mayo, Dijon mustard , lemon juice, salt and curry powder in a bowl. To the bowl add the diced chicken breast, apple, and celery. Stir to combine all ingredient until combined. Test for seasoning. Add more curry powder, salt or pepper if needed. Fold in pecans, and garnish with green onions.

  2. Serve over a bed of greens and enjoy!

January 27, 2020 /Haley Bell
1 Comment
SweetPotatoChips-28.jpg

Sweet Potato Rounds with Everything But The Bagel Seasoning →

November 05, 2019 by Haley Bell in Appetizer, Side Dish, Snacks, Dinner, Lunch

Fall and winter entertaining is here, which means lots and lots of food! Last year I found myself serving the same appetizer of a charcuterie board (which I love) but I wanted to mix it up a bit this year. We do a lot of hosting, so having easy go-to recipes ideas on hand is key. I recently tried this simple appetizer of sweet potato rounds with Everything But The Bagel Seasoning, and it turned out so good! I used three simple ingredients of white sweet potatoes, the ever so popular Trader Joe’s Everything But The Bagel Seasoning, and olive oil. It makes for such a fast and easy appetizer that also won’t fill you up too much!

SweetPotatoChips-3 (1 of 1).jpg
SweetPotatoChips-6 (1 of 1).jpg
SweetPotatoChips-7 (1 of 1).jpg

I love using white sweet potatoes in this recipe, but you can certainly use orange sweet potatoes! If you don’t live near a Trader Joe’s, they sell the Nothing But The Bagel Seasoning on Amazon as well.

SweetPotatoChips-13 (1 of 1).jpg
SweetPotatoChips-12 (1 of 1).jpg

The key to the sweet potato rounds is cutting them in an even width. I cut them in about 1/2 inch rounds and it worked perfectly.

SweetPotatoChips-15 (1 of 1).jpg

As the sweet potato rounds are baking, it smells almost like a bagel shop in your kitchen because of the seasoning! It smells amazing!

SweetPotatoChips-23 (1 of 1).jpg

You can serve this appetizer as is, or you can also add in a dipping sauce. To keep it healthy I used Primal Kitchen Ranch Dressing as a dip but you could also make a homemade ranch, katchup, mustard and the list goes on! You could also serve these along side burgers, on top of a warm fall salad, or just as an afternoon snack.

SweetPotatoChips-26 (1 of 1).jpg

If you are feeding a crowd over 4 people, I would suggest doubling the recipe. I hope you enjoy it!


Sweet Potato Rounds with Nothing But The Bagel Seasoning Recipe

Ingredients:

  • 2 medium sized sweet potatoes, cut into 1/2 inch rounds

  • 2 Tbs. olive oil

  • Nothing But The Bagel Seasoning

Directions:

  1. Preheat the oven to 450 degrees F.

  2. Cut the sweet potatoes into 1/2 inch rounds. In a large bowl, toss the sweet potatoes and the olive oil to coat.

  3. On a large baking sheet, arrange the sweet potato rounds in a single layer.

  4. Bake the sweet potato rounds for 15 minutes. Remove from the oven and flip each round. Sprinkle each round with desired amount of seasoning.

  5. Lightly spray non-stick spray over the rounds (optional), and place back in the oven for 10 minutes. Serve immediately.

This recipe was adapted from this original recipe

November 05, 2019 /Haley Bell
Appetizer, snack, healthy snack, healthy appetizer, side dish
Appetizer, Side Dish, Snacks, Dinner, Lunch
2 Comments
LoadedGreenSalmonSalad-6 (1 of 1).jpg

Loaded Green Salmon Salad Bowl with Lemon Tahini Dressing

January 10, 2019 by Haley Bell

After the holidays, I always find myself craving veggies and salads again. Most likely because of all of the dozen of cookies I ate and other heavy eating. This week I have been doing a salad challenge, where you replace one meal a day with a big salad and introduce new ingredients each day. It is actually harder than you think when you’re coming off of eating heavy foods for the past month. So, I came up with the perfect transition salad. This loaded green salmon salad bowl with lemon tahini dressing is both filling and satisfying while also getting in plenty of veggies and healthy fats. After taking my first bite, I knew I had to share this one with you!

LoadedGreenSalmonSalad-3 (1 of 1).jpg
LoadedGreenSalmonSalad-4 (1 of 1).jpg

I started by roasting some sweet potatoes and Brussels sprouts in the oven with some olive oil and salt and pepper. Since it is winter time, I love adding warm components to salads to warm it up.

LoadedGreenSalmonSalad-1 (1 of 1).jpg

For me, the key to eating salads regularly, is having plenty of veggies stocked in the fridge that you can just pull from. I like to keep a couple of different types of lettuces, hard boiled eggs, cheese, nuts, and plenty of veggies on hand.

LoadedGreenSalmonSalad-12 (1 of 1).jpg

For this salad, I started with mixed greens and added the roasted sweet potatoes and Brussels sprouts, green olives, red bell peppers, hardboiled egg, smoked salmon and avocado. I then topped it with an easy homemade lemon tahini dressing (recipe below). The best part about this salad is that you could use any veggies and protein you want! It would be amazing with grilled salmon, chicken, steak, shrimp or even tofu. This is just what I had on hand and it made for the best combo!

LoadedGreenSalmonSalad-13 (1 of 1).jpg

The next time you are craving a salad, I hope you give this one a try! I would love to know what combination of veggies and protein you use, so be sure to comment below or on my Instagram.


Loaded Green Salmon Salad Bowl with Lemon Tahini Dressing Recipe

Ingredients:

  • Mixed greens

  • Half avocado, sliced

  • 1 hardboiled egg, cut in half

  • Red bell pepper, cut in strips

  • Green olives, cut in half

  • Sliced smoked salmon (2-3 pieces)

  • 1 sweet potato

  • Brussels sprouts

  • “Everything but the bagel” seasoning to top (optional)

Lemon Tahini Dressing:

  • 2 Tbs. olive oil

  • Half the juice of 1 lemon juice

  • 1 Tbs. tahini

  • 2-3 Tbs. Water

  • Salt and pepper

Directions:

  1. Preheat the oven to 400 degrees. Cut the sweet potatoes into bite sized pieces and the Brussels sprouts in half. Place on a rimmed sheet pan and drizzle with olive oil and salt and pepper. Bake for 20-25 minutes. Remove from oven and let cool slightly.

  2. Mix all of the ingredients for the lemon tahini dressing until creamy (if it is too thick, add more water).

  3. To assemble the salad, start with a layer of lettuce and place the remaining ingredients on top. Drizzle with the lemon tahini dressing and enjoy!

January 10, 2019 /Haley Bell
3 Comments
Peppermintcookiebar3 (1 of 1).jpg

Peppermint Chocolate Chip Cookie Bars

December 11, 2018 by Haley Bell

It has been a hot minute since I have been able to post on this ol blog of mine! I wanted to pop in to share this peppermint chocolate chip cookie bar recipe with you. It is the perfect cookie bar to package up to give as gifts this holiday season, or to enjoy for yourself. What I love about cookie bars is that they require a lot less time of pulling cookies in and out of the oven, and they make a ton. Not only does this cookie bar have candy cane pieces in it, it also has mini chocolate chips and peppermint Oreo’s in it.

Peppermintcookiebar8 (1 of 1).jpg

The inspiration for this recipe came from simply browsing the isles of Trader Joe’s when I stumbled upon their seasonal candy cane “Joe-Joe’s”. If you have never had them, they are like candy cane flavored Oreo’s and they are amazing!! I knew I not only wanted to enjoy them on their own, but that I also had to add them to some baked goods this year.

Peppermintcookiebar15 (1 of 1).jpg

If you’ve been following me for some time, you might see a trend that my golden retriever pup named Paso somehow always makes it into my shoots! Don’t worry, she didn’t eat any cookies- she is just always very curious ;)

Peppermintcookiebar17 (1 of 1).jpg
Peppermintcookiebar18 (1 of 1).jpg

After testing the recipe, I decided to package some up to give as a gift to my hairdresser. I used one of my favorite Weck jars instead of just putting them on a paper plate. It truly makes for such a yummy and easy gift!

Peppermintcookiebar14 (1 of 1).jpg

I hope you have a great holiday season! I would love to know if you make this recipe, so be sure to comment below or on my Instagram.


Peppermint Chocolate Chip Cookie Bar Recipe

Ingredients:

  • 2 sticks salted butter softened

  • 3/4 cup light brown sugar packed

  • 3/4 cup granulated sugar

  • 2 large eggs

  • 1 teaspoon pure vanilla extract

  • 2 1/4 cups all-purpose flour

  • 1/2 cup instant vanilla pudding mix

  • 1 teaspoon baking soda

  • 1/2 teaspoon kosher salt

  • 1 cup mini chocolate chips

  • 1 cup crushed candy cane bits

  • 1 cup candy cane Joe-Joe’s, crushed

Directions:

  1. Preheat oven to 350 degrees F. and spray with baking oil, or line a 9x13-inch baking dish with parchment paper.

  2. Cream butter and sugars into a large mixing bowl or stand mixer until well combined. Beat in egg and vanilla. Slowly add flour, pudding mix, baking soda and salt. Stir until dough starts to form then stir in chips, candy cane bits and crushed candy cane Joe-Joe’s.

  3. Press into prepared baking dish and bake for 25-30 minutes until golden brown on top and baked through. Let cool completely before cutting into squares. Serve and enjoy!

This recipe was modified from this original recipe.

December 11, 2018 /Haley Bell
6 Comments
Pesto Salad17 (1 of 1).jpg

Heirloom Tomato Salad with Pesto and Burrata

July 17, 2018 by Haley Bell

This summertime salad was inspired by a recent trip we took to the East Coast. We were in New Jersey for a wedding that my husband was a groomsmen in. On the day of the wedding, we woke up to pouring rain with high heat and humidity. While my husband was tied up with the wedding events, I decided to head out for a walk to grab some lunch in between rain storms. I found a very cute restaurant to get some food to-go, and just as soon as I placed the order, it started absolutely down pouring outside! Almost like monsoon weather.  My order was ready but the storm was no where near being cleared. Since I was pressed for time, I had to make a run for it in my flip flops with no umbrella and walk the half mile back to the hotel. Needless to say, the roads were flooded and so was I by the time I got back to the hotel. BUT, when I opened up my to-go order, I had the most amazing salad awaiting me which made the trek worth it! I was craving it when we got back home, so I recreated it, and am happy to share this simple yet delicious heirloom tomato salad with pesto, burrata cheese and homemade croutons. 

Pesto Salad3 (1 of 1).jpg
Pesto Salad (1 of 1).jpg

When you're making a recipe with very few ingredients, the key is to use high quality ingredients. Since tomatoes are in season, I picked up a mix of them a long with fresh basil pesto. You could certainly make your own pesto, or use store bought to save on time. I also used a day old baguette to make some homemade croutons. If you've never made homemade croutons, they are so much better than store bought and take no time at all to make!

Pesto Salad6 (1 of 1).jpg
Pesto Salad7 (1 of 1).jpg

When I recreated this salad at home, I served it on a platter to share with my husband and served it along side some grilled salmon. It is perfect for those nights that you want a quick and healthy meal, and don't want to heat up the house. 

Pesto Salad10 (1 of 1).jpg
Pesto Salad12 (1 of 1).jpg
Pesto Salad14 (1 of 1).jpg

Sometimes you have to look for the silver lining in the pouring rain, like discovering an amazing salad you might not have, if it were perfectly sunny outside ;) I hope you love this recipe as much as I do!


Heirloom Tomato Salad with Pesto and Burrata Recipe

Ingredients:

  • 4 large heirloom tomatoes in a variety of colors, or 4-5 large plum tomatoes
  • 2-4 Tbs. homemade or store bought basil pesto
  • Burrata cheese, torn
  • Handful of arugula, washed
  • Mini baguette cut into 1/2 inch cubes
  • Maldon sea salt and pepper, to taste
  • Olive oil

Instructions:

  1. Slice the mini baguette into 1/2 inch cubes. In a heated skillet with butter and olive oil, toast the croutons until golden brown. Sprinkle with Maldon sea salt and set on a plate lined with a paper towel to cool. 
  2. Core the heirloom tomatoes and slice a 1/4 inch thick. In a large bowl, toss the tomatoes with the pesto, adding more to taste. Arrange on a serving platter.
  3. Place the cooled croutons between the tomato slices. Tear pieces of the burrata cheese, placing the dabs of cheese on top of the tomatoes. Add a handful of arugula on top of the tomato mixture. Drizzle olive oil over the top and sprinkle with Maldon sea salt and freshly ground pepper. Serve and enjoy!
July 17, 2018 /Haley Bell
1 Comment
ChocChipBananaBread-5.jpg

Chocolate Chip Banana Bread

May 08, 2018 by Haley Bell

Well, it happened again. I "accidentally" let some bananas get too ripe and just had to bake something with them! Instead of baking a loaf of traditional banana bread, I opted to try out chocolate chip banana bread and it turned out amazing. The next time you notice your bananas getting a little too ripe, this recipe is a must try!

ChocChipBananaBread-1.jpg

I cannot even explain to you how amazing this bread smells when it is cooking. It fills your kitchen with scents of brownies and banana bread all in one. And, not to mention the slightly melted chocolate chips on top when you bring it out of the oven. 

ChocChipBananaBread-3.jpg
ChocChipBananaBread-11.jpg
ChocChipBananaBread-12.jpg

Since I do quite a bit of baking, I decided after doing the taste testing for this bread, to give the rest to a friend and she loved it! Nothing makes me happier than packaging up baked goods to gift to someone.

ChocChipBananaBread-8.jpg

 This bread makes for the perfect hostess gift, brunch , snack or dessert. But really, you don't even need an excuse to make it! I would love to know what you think of this recipe, so be sure to leave a comment below or on my Instagram :)


Chocolate Chip Banana Bread Recipe

Ingredients:

  • 1 cup all-purpose flour
  • 1/2 cup Dutch process cocoa
  •  teaspoon baking soda
  • 1/2 teaspoon sea salt
  • 3 large brown bananas  (1 1/2 cups mashed)
  • 1/4 cup unsalted butter, melted and slightly cooled
  • 1/4 cup canola, vegetable oil, or melted coconut oil
  • 3/4 cup packed light brown sugar
  • 1 large egg, at room temperature
  • 1 teaspoon pure vanilla extract
  • 1 cup semisweet chocolate chips, divided

Directions:

  1. Heat your oven to 350°F. Grease a 9-by-5-inch loaf pan with nonstick cooking spray and set aside.
  2. In a medium bowl, whisk together the flour, cocoa powder, baking soda, and sea salt. Set aside.
  3. In a large bowl, mash the ripe bananas with a fork. Add the melted butter and oil and stir until combined. Stir in the brown sugar, egg, and vanilla extract. Stir until smooth.
  4. Stir the dry ingredients into the wet ingredients, don’t overmix. Stir in 3/4 cup of the chocolate chips.
  5. Pour batter into prepared pan. Sprinkle the remaining 1/4 cup of chocolate chips over the top of the bread. Bake for 50-65 minutes, or until a toothpick inserted into the center of the bread comes out mostly clean, you might have some melted chocolate chips on the toothpick and that is fine. You just don’t want a lot of gooey batter. Check at 50 minutes, just to be safe. Oven times vary.
  6. Remove the pan from the oven and set on a wire cooling rack. Let the bread cool in the pan for 15 minutes. Run a knife around the edges of the bread and carefully remove from the pan. Let the bread cool on the wire cooling rack until slightly warm. Cut into slices and serve.

This recipe was adapted from this original recipe.

May 08, 2018 /Haley Bell
Comment
CitrusSalad-10.jpg

Citrus & Avocado Salad with Balsamic Shallot Vinaigarette

April 06, 2018 by Haley Bell

Last weekend was the first weekend that actually felt like spring weather around here! We spent the weekend working on our new vegetable garden, BBQ'ing and trying out some new spring recipes. This citrus and avocado salad with balsamic shallot vinaigrette is the perfect spring and summer salad! The balsamic dressing recipe has been passed down through family and friends through the years and is hands down my favorite dressing! It pairs perfectly with the citrus, tang from the feta cheese and saltiness of the pistachio nuts in this salad. 

CitrusSalad-7.jpg
CitrusSalad-6.jpg

The best part about this salad is that it can quickly be assembled for an easy weeknight dinner, or to feed a crowd. I like to assemble the salad on a platter ahead of time, leaving off the avocado and dressing and then when I get home from a busy day, all I have to do is toss it! And, I always have a jar of this dressing recipe stocked in my fridge, because it's just that good!

CitrusSalad-12.jpg
CitrusSalad-11.jpg
CitrusSalad-14.jpg

Although the rain has returned now, I look forward to the warmer months ahead and enjoying this salad recipe again and again! I would love to know if you try this recipe, so be sure to leave a comment below or on my Instagram :)

CitrusSalad-18.jpg
CitrusSalad-16.jpg

Citrus & Avocado Salad with Shallot Vinaigrette Recipe

Salad Ingredients:

  • 2-3 heads of butter lettuce, washed 
  • 2 ripe avocados, sliced
  • 2 blood oranges, thinly sliced
  • 2 oranges, thinly sliced
  • 2 cara cara oranges, thinly sliced 
  • Feta cheese 
  • Pistachio nuts (or any kind of nuts) 

Balsamic & Shallot Vinaigrette Ingredients:

  • 3/4 cups olive oil
  • 2 Tbs. red wine vinegar
  • 2 Tbs. balsamic vinegar
  • 1 tsp. Dijon mustard
  • 1 small shallot, finely diced
  • Salt and pepper 

Directions:

  1. Carefully trim the butter lettuce leave off the head. Rinse well and dry.
  2. Toss the full leaves, and avocado with the vinaigrette and serve on a large platter. Top with the citrus, feta cheese and pistachio nuts. (As noted above, you can also pre-assemble the salad and add the avocado and vinaigrette to toss). 
April 06, 2018 /Haley Bell
Comment
Marshmallows-10.jpg

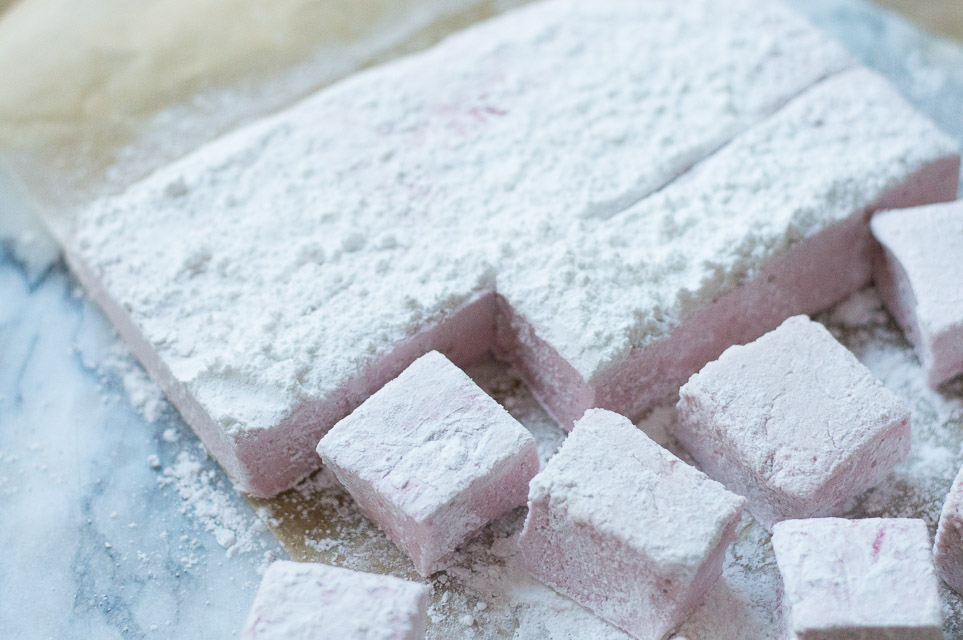
Homemade Raspberry Marshmallows

February 15, 2018 by Haley Bell

I had never tried making homemade marshmallows before, and now I am fairly certain I can never go back to store bought again! The inspiration for these marshmallows came from a recent hotel stay where my husband and I ordered the most amazing ice cream sundae. The sundae had layers of ice cream, brownies and homemade marshmallows. We both loved the marshmallows, and I knew I needed to recreate them at home. I decided to take it a step further and create raspberry marshmallows which turned out amazing! They are incredible on their own, in hot coco, in ice cream sundaes, s'mores, and the list goes on and on! 

Marshmallows-7.jpg
Marshmallows-8.jpg

I think one of the most surprising things about making homemade marshmallows, was finding out how easy they are to make. There are a couple of steps involved, but they come together rather quickly. And, they keep for a couple of weeks, so it's worth the effort.

Marshmallows-5.jpg
Marshmallows-11.jpg

I love the more rustic look of the marshmallow's, so I used scissors (that were clean!) to cut them in strips and then into cubes. I also chose to use an 8x8 pan to make thicker marshmallows, and I loved how they turned out. 

Marshmallows-15.jpg

I chose to use fresh raspberries (frozen would also work) instead of freeze dried, and my husband and I both loved how you could taste the natural flavor of the raspberries. It was the perfect amount of sweetness without being too over powering. It also turned them a pretty light pink color and gave it a marbling effect!

Marshmallows-17.jpg

We will be making these again and again! We can't wait to try these out this summer while sitting around a fire making s'mores. I would love to know what you think of the recipe, so be sure to comment below or on my Instagram :)


Homemade Raspberry Marshmallows Recipe

Ingredients:

  • 3 packages unflavored gelatin
  • 1 cup ice cold water, divided
  • 1 ½ cups granulated sugar
  • 1 cup light corn syrup
  • ¼ teaspoon kosher salt
  • 1 teaspoon vanilla extract
  • ¼ cup confectioners’ sugar
  • ¼ cup cornstarch or arrowroot powder

Raspberry Puree:

  • 1 cup fresh raspberries, washed
  • 1 tablespoon granulated sugar
  • pinch of salt

Directions:

  1. To make the raspberry puree, add the raspberries, sugar and salt to high speed blender or food processor. Blend until smooth. Strain the puree through a fine mesh sieve to remove the seeds and then set aside. You should have about a heaping ⅓ cup of raspberry puree.
  2. To make the marshmallows, add the gelatin and ½ cup of the ice cold water to the bowl of a stand mixer fitted with the whisk attachment.
  3. In a small saucepan, add the remaining ½ cup water, granulated sugar, corn syrup and salt. Place the pan over medium high heat and cover with lid. Allow the mixture to cook for 3 to 4 minutes. Remove the lid and attach a candy thermometer to the pan. Cook until the mixture reaches 240 degrees. Immediately remove from the heat.
  4. Turn your stand mixer on low speed and while running, slowly (and carefully) pour in the hot mixture in a stream down the side of the bowl. Once all the liquid is added, increase the mixer speed to high. Continue to whip for about 12 to 15 minutes, until the mixture is very thick and lukewarm. During the last minute of whipping, add in the vanilla extract and raspberry puree (start with the mixer on low and then increase again to high once incorporated).
  5. Meanwhile, while the mixture is whipping, whisk together the confectioners’ sugar and cornstarch in a small bowl. Lightly spray a 8 by 8 inch baking dish with nonstick cooking spray. Generously coat the bottom and sides of the pan with a dusting of the confectioners’ sugar mixture, reserving the rest for later.
  6. When the marshmallow mixture is ready, pour into the prepared dish and use a lightly greased spatula to spread evenly in the pan. Sprinkle the top generously with the confectioners’ sugar mixture, using enough for it to be lightly covered. Let the marshmallows sit uncovered at room temperature for at least four hours (and up to overnight).
  7. Gently remove the marshmallow from the pan and place on a cutting board. Using a pizza wheel or scissors dusted with the confectioners’ sugar mixture, cut into 1-inch squares. Once cut, lightly dust all the sides of each marshmallow with the confectioners’ sugar mixture (making more if needed) to prevent them from sticking. Store the marshmallows in an airtight container for up to 3 weeks.
February 15, 2018 /Haley Bell
Comment
raspberryscones-20.jpg

Raspberry Scones with Vanilla Glaze

December 04, 2017 by Haley Bell

There are few things in the kitchen that I have always had a fear of making. Scones, pie crust, and cooking a whole turkey are a few of them. I decided to tackle one of my fears in the kitchen by making homemade raspberry scones. Much to my surprise, the process of making them was a lot easier than I expected, but there were still a few surprises a long the way! If you follow me on Instagram, you might have seen that the size of my first batch of scones turned out way too big. After a bit of recipe testing, I am excited to share my favorite raspberry scone recipe with you. And, now I have officially conquered one of my fears in the kitchen ;)

raspberryscones-1.jpg
raspberryscones-17.jpg

If you have ever made scones, you probably already know that the key is keeping the ingredients cold. I tested cubing the butter and also grating it, and both methods work. It's more a matter of having the patience to grate 4 (I know it's a lot) sticks of butter.

raspberryscones-4.jpg
raspberryscones-5.jpg

I chose to use raspberries in this recipe, but you could certainly use any berries you'd like! I used fresh raspberries vs. frozen and tossed them in some flour to help hold their shape. You could also use frozen or dried berries. 

raspberryscones-9.jpg
raspberryscones-18.jpg
raspberryscones-11.jpg

I formed the dough into a ball and then rolled used a wooden rolling pin to roll it out flat. As you can tell from the picture, I made mine more rustic and not perfectly shaped. You could also cut them into circles or even smaller triangles as well. 

raspberryscones-12.jpg
raspberryscones-16.jpg
raspberryscones-14.jpg

The last step before you pop these into the oven is to give them a quick egg wash and sprinkle some sugar on the top. Trust me, you don't want to miss these last two steps :)

raspberryscones-22.jpg
raspberryscones-34.jpg

As soon as you pull the scones out from the oven, it is time to drizzle on the amazing vanilla glaze! You could certainly leave the glaze off but it takes these scones to the next level.

raspberryscones-24.jpg
raspberryscones-27.jpg
raspberryscones-32.jpg

These are the perfect scones to serve for Christmas morning, or really any morning of the year. They are that good! I hope you give this recipe a try and enjoy it as much as we did :)


Raspberry Scone Recipe

Ingredients:

  • 4 cups all-purpose flour, plus 1 Tbs. for coating berries 
  • 2 Tbs. sugar, plus additional for sprinkling
  • 2 Tbs. baking powder
  • 2 tsp. salt
  • 3/4 lb. cold unsalted butter, diced (this is generally 4 sticks)
  • 4 extra-large eggs, lightly beaten
  • 1 cup cold heavy cream
  • 1 cup raspberries (fresh or frozen)
  • 1 egg, beaten with 2 Tbs. cream, for egg wash

Vanilla Glaze:

  • 1/2 cup powdered sugar
  • 2 tsp. vanilla
  • 1-3 Tbs. heavy whipping cream

Directions:

  1. Preheat the oven to 400 degrees F.

  2. In the bowl of an electric mixer fitted with a paddle attachment, combine 4 cups of flour, 2 tablespoons sugar, baking powder, and salt.
  3. Blend in the cold butter at the lowest speed and mix until the butter is in pea-sized pieces.
  4. Combine the eggs and heavy cream and quickly add them to the flour and butter mixture. Combine until just blended.
  5. Toss the raspberries with 1 Tbs. of flour, add them to the dough, and carefully fold into the mix.
  6. Dump the dough out onto a well-floured surface and be sure it is well combined. You should see clumps of butter. Flour your hands and a rolling pin and roll the dough 3/4-inch thick.
  7. Cut into squares with a 4-inch plain or fluted cutter, and then cut them in half diagonally to make triangles.
  8. Place on a baking sheet lined with parchment paper. Place in the freezer for an hour, to hold its shape. 
  9. Remove from freezer and brush the tops with egg wash. Sprinkle with sugar and bake for 20 to 25 minutes, until the outsides are crisp and the insides are fully baked.
  10. For the glaze, whisk together the powdered sugar, vanilla and whipping cream. If the glaze is too thick, continue to add more cream. Pour over warm scones and enjoy!

*This recipe is modified from this original recipe.

December 04, 2017 /Haley Bell
Comment
ChickenSoup-10.jpg

Go-To Chicken Soup

November 09, 2017 by Haley Bell in Lunch, Dinner

Last weekend was our first weekend of rain, which meant it was time to make my fist pot of soup for the season! Over the years I have developed my "go-to" soup recipe for whenever it is cold out, someone is sick, or when we just need a bowl of comfort. It is healthy yet filling and satisfying. And, there is one secret ingredient that gives it a ton of flavor and creamy texture without adding in any cream, butter or dairy :) 

ChickenSoup-2.jpg

I love setting the table for dinner, even if it is just my husband and I on what would otherwise be an "ordinary" weeknight meal of soup. I pulled out my favorite mix of napkins and my favorite serving trays.

ChickenSoup-6.jpg
ChickenSoup-14.jpg

The best part about this recipe is that you can add any veggies to it that you'd like, or any protein. I also like to cute corners a bit and use a store bought rotisserie chicken when I can. I have served the soup on its own, in a bread bowl (my husbands favorite), with corn bread or with a crusty loaf of bread on the side. I have also served it with grilled cheese. Yum!

ChickenSoup-18.jpg

I hope the next time you're in need of a bowl of comfort, you give this recipe a try! I would love to know what you think of it it so be sure to comment below or on my Instagram. 


Go-To Chicken Soup Recipe

Ingredients:

  • 2 Tbs. olive oil
  • 5 stalks celery, chopped
  • 4 large carrots, sliced
  • 1 large onion, diced
  • 64 oz. chicken broth
  • 5 medium yukon gold potatoes or 7-10 small red potatoes, scrubbed and cut into 1 inch cubes
  • 2 cups cooked rice or quinoa (optional)
  • 4 medium chicken breasts, cooked and shredded
  • 2 Tbs. Dijon mustard (this is what makes it creamy!)
  • salt and black pepper
  • season salt to taste, Lawry's (optional)
  • 1/2 cup parsley, chopped

Directions:

  1. Heat oil in a large pot over medium heat. Saute onion, celery and carrots until softened, about 5 minutes. 
  2. Stir in chicken broth and potatoes. Increase heat to high just until broth starts to boil.  Reduce to medium high and cook potatoes for 10 minutes or until fork tender. 
  3. Reduce heat to low and stir in rice or quinoa, chicken, and dijon mustard. Season to taste with salt, pepper and season salt.  Stir in fresh parsley and simmer. Serve and enjoy!
November 09, 2017 /Haley Bell
lunch, dinner, gluten free, soup, chicken soup, chicken, healthy
Lunch, Dinner
4 Comments
Capreseboats-8.jpg

Caprese Spaghettie Squash

September 27, 2017 by Haley Bell in Dinner, Lunch

It may officially be fall, but the weather sure is still making its full transition. Even on the warmest of fall days, I have found myself craving comfort food. I have also found myself craving easy weeknight meals.. This recipe for caprese spaghetti squash is the perfect transitional meal from summer to fall. 

Capreseboats-5.jpg
Capreseboats-4.jpg
Capreseboats-1.jpg
Capreseboats-2.jpg

One of the best parts about this recipe is that it only requires 2 baking sheets, making for very easy cleanup! The other amazing thing is that you can roast the tomatoes in the oven at the same time as the sphaghetti squash. I love a good time saving recipe :)

Capreseboats-9.jpg
Capreseboats-14.jpg

Once everything is roasted, it is time to assemble the sphaghetti squash. I scrapped all of the spaghetti squash "noodles" out of the shell, sprinkled it with salt, and mixed it with marinara sauce. I placed the spaghetti squash "noodles" back into the shell and layered it with the oven roasted tomatoes, fresh basil leaves, mozzerella and parmesan cheese. 

Capreseboats-7.jpg
Capreseboats-10.jpg
Capreseboats-12.jpg
Capreseboats-19.jpg

When I pulled them out of the oven, I sprinkled them with fresh basil and topped them with pine nuts. You could also add some additional cheese or any other toppings you'd like to them.

Capreseboats-17.jpg
Capreseboats-21.jpg

I hope you enjoy this recipe as much as we did!


Caprese Sphaghetti Squash Recipe

Ingredients:

  • 1 medium spaghetti squash, cut and half and cleaned out
  • 1/2 pint cherry tomatoes 
  • 1 cup marinara sauce (more or less, depending on your preference)
  • 1/3 cup fresh basil leaves, chopped (plus more for garnish)
  • 6 thick slices fresh mozzerella cheese 
  • 2 Tbs. parmesan cheese
  • 2 Tbs. olive oil
  • 1/2 tsp. salt
  • Salt and pepper to taste

Directions:

  1. Preheat oven to 375 degrees. 
  2.  Line a baking sheet with parchment paper or grease with olive oil or cooking spray. 
  3. With a sharp knife, carefully cut spaghetti squash in half lengthwise. With a spoon, gently remove seeds and discard. Place spaghetti squash cut side down on baking sheet. Bake for 45 minutes or until a fork can pierce the shell easily.
  4. Place the tomatoes on a baking sheet and drizzle with olive oil. Sprinkle with the salt. During the last half of the squash cooking time, place the tomatoes in the oven and roast for approximately 20 minutes, until the tomatoes are shrivelled. Set aside.
  5.  Remove both the squash and the tomatoes from the oven. When the squash is just cool enough to touch, flip the squash over.  Turn the oven to broil.
  6. With a fork, loosen and separate spaghetti squash strands from shell. Reserve shells.
  7. Place strands in a bowl. Mix strands with  salt (don't skip this step), and pasta sauce. Adjust the amount of sauce you use based on your own preference. Spoon mixture back into the empty shell. 
  8. Sprinkle half of the fresh basil leaves and half of the cherry tomatoes on each squash half. Grate the parmesan cheese over top and top each side with 3 slices of the mozzarella cheese.
  9. Broil for 3-4 minutes or until the cheese starts to melt. Top with additional basil (optional) and pine nuts. Serve and enjoy!
September 27, 2017 /Haley Bell
dinner, easy dinner, easy recipe, caprese, spaghetti, cheese
Dinner, Lunch
Comment
SalmonSalad.22.jpg

Easy Weeknight Dinner: Loaded Salmon Salad

September 10, 2017 by Haley Bell in Dinner, Lunch

Whenever I ask my readers what kind of recipes they want to see more of, there is always an overwhelming request for easy weeknight dinner recipes. I get it. Dinner can be a struggle to get on the table at the end of the day, and not to mention the dishes that follow. As much as I love spending time in the kitchen, I am always challenging myself to come up with healthy meal ideas that can be made ahead of time, and that require very few dishes. Now, before you roll your eyes at a salad recipe, hear me out on this one. This salad is so versatile, pretty much any type of veggies and protein work. And the best part is that you can make the dressing, assemble the salad and even cook the protein ahead of time. This recipe definitely checks all the boxes which makes for the perfect weeknight (or any night) dinner solution!

SalmonSalad.2.jpg
SalmonSalad.4.jpg
SalmonSalad.3.jpg

I used fresh salmon in this recipe, but chicken, steak or any other kind of protein would be great. You could even pick up a rotisserie chicken from the store to make things even easier!

SalmonSalad.7.jpg

To make this salad ahead of time, I made the dressing (recipe below) and put it in a jar in the fridge. I then washed and cut up the lettuce and veggies, and assembled them on a platter. You could either cook the protein ahead of time or wait until right before you are going to serve it. I put plastic wrap on it and stuck it in the fridge and when I got home from a long day, dinner was done and ready to eat! 

SalmonSalad.16.jpg
SalmonSalad.11.jpg

I hope you give this recipe a try on a weeknight when you're in need of an easy dinner! Also let me know what your go-to weeknight dinner recipes are :)

SalmonSalad.23.jpg

Salmon Salad Recipe 

Ingredients:

  • 2, 6 ounce center cut salmon filets 
  • 1 head red leaf lettuce, washed and cut 
  • 1 ear white corn, kernels removed
  • 1/2 cup cherry tomatoes, halved
  • 1/2 cup cauliflower florets
  • 1/2 cup green olives (natural green olives, not "martini" olives)
  • 1/2 cup hearts of palm, cut on the diagonal
  • 2 medium carrots, cut on the diagonal
  • 1 ripe avocado, diced
  • Optional: 1/2 cup feta cheese and pecans

Vinaigrette Dressing Ingredients:

  • 1 small shallot, minced
  • 1 tsp. honey
  • 2 tsp. Dijon mustard
  • 1/4 cup red wine vinegar
  • 1/2 cup olive oil
  • salt and pepper 

Directions:

  1. Preheat the oven to 375 degrees. Drizzle olive oil and salt and pepper on salmon filets. On a prepared baking sheet, place the salmon into the oven for 15-20 minutes or until flakey. 
  2. Arrange the greens on a large serving platter. Arrange the other veggies around the platter. 
  3. Mix all of the dressing ingredients until well combined.
  4. Place the salmon on top of the salad. Drizzle the salad with vinaigrette dressing, and enjoy!

*The vinaigrette recipe was adapted from this source.

September 10, 2017 /Haley Bell
healthy, dinner, weeknight meal, salmon, salad, salmon salad, gluten free
Dinner, Lunch
Comment

Cashew Butter & Fig Toast

July 28, 2017 by Haley Bell in Breakfast, Appetizer, Snacks

It seems everywhere I turn, there is a toast craze going on! Avocado toast has become a permanent fixture on many restaurant menus. I love avocado toast and could eat it every day but I decided to do a take on the classic peanut butter and jelly flavor combination. I used cashew butter and fresh figs and the results were incredibly delicious! I also topped it off with a drizzle of honey and Maldon sea salt to give it that sweet and savory flavor combination. During the summer months, I am always looking for easy breakfast and snack ideas, and this one is perfect!

Since the fig season here in California is rather short, I couldn't resist these when I saw a fresh basket at my farmers market. I have been adding them to everything from this toast, to salads, to cheese plates.

If you are doing any upcoming entertaining, you could to set out a "toast bar" for people to make their own. A basket of rustic bread, and all the fixings make it not only a cute display but also such an easy and delicious menu item. 

I started by slicing up a rustic loaf of bread and lightly toasting it. From there, I spread an even layer of the cashew butter and topped it with the sliced figs, honey and Maldon sea salt. It comes together in minutes!

Of course as I was just getting in the zone of shooting this blog post, our puppy woke up from her nap and quickly discovered that she wanted to be my little "helper" in the kitchen! ;) I might not have ended up getting all the shots I wanted for this post but the silver lining was that we had so much fun even if I had to tell her to get off the table a million times! 

I would love to hear if you make this toast recipe or if you want to share any of your favorite toasts recipes! Be sure to comment below or on my Instagram. Enjoy! 


Cashew Butter and Fig Toast Recipe

Ingredients:

  • Loaf rustic bread (or favorite bread)
  • Raw cashew Butter
  • 3-5 fresh gigs, sliced 
  • Raw honey
  • Maldon sea salt

Directions:

  1. Slice loaf of bread in 1 inch thickness and lightly toast. Spread an even layer of cashew butter, followed by a layer of sliced figs. Top with a drizzle of honey and maldon sea salt. Serve and enjoy!
July 28, 2017 /Haley Bell
breakfast, snack, cashew butter, fig, toast, cashew and fig toast
Breakfast, Appetizer, Snacks
Comment

Blistered Tomato, Burrata & Pesto Flatbread

June 13, 2017 by Haley Bell in Dinner, Lunch, Appetizer

The warmth of summer is here and I couldn't be happier about it! As sad as I am to see the spring season go, I am looking forward to the easy living the Summer months provide. We recently added a golden retriever puppy to our family, so in between keeping up with her and our work schedules, I am always looking for simple yet delicious dinner ideas. This recipe was inspired by my recent trip to our farmer's market where I was so excited to see the most beautiful tomatoes and bundles of fresh basil. This blistered tomato, burrata and pesto flatbread comes together in minutes and is loaded with amazing flavor. 

When you use quality ingredients, you don't need to add a lot to them. I used a mix of fresh cherry tomatoes, sliced shallots and drizzled them with olive oil and Maldon sea salt. If you are making this for a party, you could do this step ahead of time and then just reheat them right before placing them on the flatbread.

I blended up a fresh batch of pesto for this recipe but you could certainly use a jar of store bought pesto. I could eat it by the spoonful ;)

The smell you get from the blistered tomatoes is amazing! It always reminds me of when I'm shopping in a William Sonoma store. Have you ever noticed how amazing it always smells in that store?

Assembling the flatbread is so simple. I spread a few spoonfuls of the pesto on top of the flatbread, added torn pieces of the burrata cheese, and topped it with the blistered tomatoes. For a little kick, I also added a few red pepper flakes. I can't even tell you how incredible this flavor combination is! 

This flatbread is perfect as an appetizer for a summer party or it makes for an amazing easy dinner served along side a summer salad. It can also easily be altered to fit any dietary restrictions with a gluten free crust, dairy free cheese, etc.  

I hope you add this recipe to your summer menu! I would love to hear what some of your favorite summer recipes are, so be sure to comment below or on my Instagram :)


Blistered Tomato, Burrata & Pesto Flatbread Recipe

Ingredients:

  • 1 flatbread OR 1/2 pound pizza dough
  • 2 cups fresh burrata cheese, torn into pieces
  • 1/2 cup pesto 
  • 1 cup blistered cherry tomatoes
  • Maldon sea salt
  • cracked black pepper
  • crushed red pepper flakes to garnish

Blistered Tomatoes:

  • 1 cup cheery tomatoes
  • 1 small shallot, thinly sliced
  • 2 Tbs. olive oil
  • Maldon sea salt and freshly ground pepper

Directions:

  1. Preheat the broiler. In a medium baking dish, toss the cherry tomatoes, shallot and olive oil and season with Maldon sea salt and cracked black pepper. Place under the broiler for about 5 minutes, or until the tomatoes pop and are lightly brown. 
  2. Preheat the oven to 400 (450 degrees for pizza dough) degrees. Place the flatbread on a baking sheet and lightly brush olive oil on top. Bake for 3-5 minutes (for pizza dough 8-12 minutes) till golden. Remove from oven and top with pesto and torn fresh burrata cheese. Let the burrata melt (can place back in the oven for a minute to speed up the process) before topping with the blistered tomatoes. Sprinkle with crushed red pepper flakes (optional). Slice and enjoy! 
June 13, 2017 /Haley Bell
tomatoes, flatbread, pesto, burrata cheese, summer, easy dinner, easy recipe
Dinner, Lunch, Appetizer
Comment

Lemon Thyme Bread

April 13, 2017 by Haley Bell

Spring time is one of my favorite times of year! Growing up it meant picking out a new dress for Easter, planting our vegetable garden, and lots of time in the kitchen cooking Spring recipes. We had a lemon tree in our backyard and we always had fresh thyme in the garden, so during Spring my mom used to always make her famous lemon thyme bread. Just smelling the fresh squeezed lemon juice and pulling off the thyme leaves takes me right back to my childhood. This is our first Spring living back in Northern California, so I was feeling extra nostalgic and knew I had to make this bread recipe. And, although it's never as good as when your mom makes it, it still turned out amazing! 

I can't begin to tell you how amazing this bread smells when it's baking! Once you pull the bread out of the oven, you pour the amazing lemon glaze on top so it evenly coats the bread.

Although I called it "icing" growing up, the glaze was always my favorite part about this recipe. I like to pour the glaze on the bread in 1-2 coats, letting it harden in between. This way it gives it a nice and even coating and the flavor is amazing!

Once you let the bread cool and the glaze sets, it is time to pick out the serving platter and napkins! I used one of my favorite cake stands that has similar colors as the bread from Bellissimo Decor Store. I kept it simple with adding some fresh sprigs of thyme and lemons. I love using the ingredients as decor :)

I used my current favorite assortment of napkins for serving. All of the different colors and textures of these napkins matched perfectly with the cake stand and complimented the overall presentation of the bread. 

This bread is perfect to serve at Easter brunch or any Spring event you might be hosting. We also like to keep a loaf of it on our counter in a covered cake stand during the Spring months :)

I hope you give this recipe a try! I would love to see pictures of your recipe and hear how you like it, so be sure to tag me on Instagram or in the comments below :)


Lemon Thyme Bread Recipe

Ingredients:

  • 3/4 cup milk
  • 1 Tbs. lemon balm
  • 1 Tbs. finely chopped lemon thyme (or regular thyme)
  • 2 cups all-purpose flour
  • 1 1/2 tsp. baking powder
  • 1/4 tsp. salt
  • 6 Tbs. butter, at room temperature
  • 1 cup sugar
  • 2 eggs
  • 1 Tbs. grated lemon zest

Lemon Glaze Ingredients:

  • Juice of 2 lemons
  • Confectioners sugar

Directions:

  1. Butter a 9 x 5 inch pan. Pre-heat the oven to 325 degrees. Heat the milk with the chopped herbs and let steep until cool. 
  2. Mix the flour, baking powder and salt together in a bowl. In another bowl, cream the butter and gradually beat in the sugar. Continue beating until light and fluffy. Beat in the eggs, one at a time. Beat in the lemon zest. Add the flour mixture alternatively with the herbed milk. Mix until the batter is just blended. 
  3. Put the batter into the prepared pans. Bake for 45-50 minutes, or until a toothpick inserted in the center comes out dry. 
  4. During the last few minutes of cook time, prepare the lemon glaze. Put the lemon juice in a bowl and add the sugar, stirring until a think put still pourable paste forms. Set aside.
  5. Remove the bread from the pan onto a wire rack that is set over a sheet of waxed paper. Pour lemon glaze over the still-hot bread. Repeat the glaze step for extra coating (optional). Decorate with sprigs of thyme and serve :)


April 13, 2017 /Haley Bell
2 Comments

Avocado Pesto "Pasta" with Blistered Tomatoes

March 17, 2017 by Haley Bell in Dinner, Lunch, Side Dish

There is nothing quite like a warm Spring day! We have been having a few of them lately here in California (don't worry- we have rain in the forecast all week), so we have been soaking it up. The warmer weather makes me want to swap out soups and stews for some lighter meals. That's what lead me to create this amazing avocado pesto "pasta" with blistered tomatoes. It is so light yet creamy and it's perfect on its own or next to some grilled chicken or salmon. It also comes together in minutes making it the perfect weeknight meal. I hope you make this one of your go-to dishes this Spring and throughout the Summer months ahead. 

Have you ever spiralized zucchini to create zucchini "noodles"? That's probably a silly question since it's been a food craze for a while. But, I have to admit this was my first time trying it. And now, I get all the hype! They were the perfect "noodle" for this dish since the avocado pesto perfectly coats them. You could certainly use regular pasta noodles in this dish (I won't judge)! 

I used my Vitamix blender to make the pesto sauce and it worked great! You could also use a food processor as well. If you find that your sauce is too thick for your taste, you can always add an extra drizzle of olive oil and/or lemon juice to thin it out a bit. Or, if you are using regular pasta noodles, you could add some of the cooking water to the sauce. 

The blistered tomatoes not only give this dish a nice color, but they also add a slight sweetness! 

AvocadoPestoPasta-26.jpg

To plate this dish, I simply tossed the zucchini noodles with the sauce and piled it on the plate with the blistered tomatoes. To finish it off, I grated some fresh parmesan cheese on top and it is perfection! You could also add some fresh cracked pepper and salt to taste.

AvocadoPestoPasta-36.jpg

I hope you give this recipe a try and love it as much as we do! As always, feel free to leave any questions or comments below or on my Instagram :)


Avocado Pesto "Pasta" with Blistered Tomatoes Recipe

Ingredients:

  • 2-4 zucchini, spiralized (2 large or 4 small)
  • 3 cups red and yellow mini tomatoes
  • Freshly grated parmesan cheese for topping

Avocado Pesto:

  • 1 large bunch basil, washed
  • 2 ripe avocados
  • 3 green onions (green parts)
  • ½ cup unsalted walnuts
  • 2 Tbs. lemon juice
  • 1 clove garlic
  • ½ tsp. sea salt
  • ½ cup extra virgin olive oil
  • Freshly ground pepper to taste 

Directions:

  1. Put all of the pesto ingredients into a blender or food processor and pulse until smooth. Set aside.
  2. Heat the cherry tomatoes with a drizzle of olive oil in a large skillet over medium high heat. Gently shake the pan to get them moving. Continue cooking until the tomatoes are roasty and the skins are split or loosened. Remove from heat and set aside.

  3. Bring a separate pan to medium high heat with a drizzle of olive oil. Add the spiralized zucchini. Toss for 1-2 minutes, until tender-crisp. Remove the pan from the heat and combine the zucchini with the pesto sauce. Toss until combined. Season with salt and pepper, top with tomatoes and sprinkle with parmesan cheese. Serve immediately.

Note: I am on the conservative side with garlic, so if you like your garlic flavor strong, add an extra clove or two.

March 17, 2017 /Haley Bell
pesto, pasta, zucchini, zucchini noddles, healthy, gluten free, paleo, tomatoes, dinner, spring recipe, recipe
Dinner, Lunch, Side Dish
Comment

Almond Butter Chocolate Chunk Banana Bread

February 15, 2017 by Haley Bell in Breakfast, Dessert, Snacks

Do you ever look over at your fruit bowl and see your bananas start to get just a little bit brown? And then choose to ignore them so you can bake something with them? I hate to admit I do this more often than not. I have made a lot of baked goods with bananas in them (remember these?), however I had never tried putting almond butter in the batter before. What a game changer! Combined with chocolate chunks, the flavor and texture is amazing. You are going to want to let your bananas get brown just so you can make this recipe! 

I cleaned up the ingredients for this bread so that it fits most allergy restrictions, and you don't have to feel bad about eating it. To insure each bite has that amazing chocolate flavor, I used my favorite semisweet chocolate chunks. A good quality chocolate makes a big difference in this recipe. 

When my husband got home from work the day I made this, he walked in the door saying how amazing the house smelled! After dinner we enjoyed a few too many slices of the bread for dessert and had some for breakfast the next morning. This bread did not last long in our house! In fact, I see some bananas on our counter that are turning brown and I am thinking of making another loaf. It's that good! 

I hope you give this recipe a try and enjoy it as much as we do! Be sure to let me know how you like it below or on my Instagram. Happy baking :) 


Almond Butter Banana Bread Recipe

Ingredients:

  • 1/3 cup real maple syrup
  • 1/2 cup almond milk
  • 1 egg
  • 2 tsp. vanilla extract
  • 3 cup overripe bananas, mashed (about 1 cup)
  • 1/4 cup coconut sugar
  • 1 1/2 cup extra fine almond flour
  • 1 1/2 tsp. baking soda
  • 1/2 teaspoon salt
  • 1 cup chocolate chunks
  • 1/2 cup creamy almond butter

Directions:

  1. Preheat the oven to 350 degrees F. Grease a 9x5 inch loaf pan and line with parchment paper. In a mixing bowl, combine the maple syrup, almond milk, egg, vanilla, banana, and coconut sugar until well combined. Beat in the almond flour, baking soda and salt until just combined.

  2. Stir in the chocolate chunks. Now take the almond butter and add it to the batter in teaspoon full size dollops and then gently swirl it into the batter. Pour the batter into the prepared loaf pan and sprinkle with chocolate chunks if desired...you may also now push in a few extra teaspoons of almond butter too!

  3. Place loaf pan on a baking sheet and set in the oven. Bake for 50-60 minutes, or until center is set. If the top begins to brown (mine did after about 45 minutes), tent the bread with aluminum foil. Remove and let cool for at least 30 minutes before cutting. Bread will keep (covered) for 3-5 days. Serve and enjoy! 

* This recipe was adapted from this original recipe.

February 15, 2017 /Haley Bell
healthy snack, snack, breakfast, dessert, banana bread, banana, almond butter, almond, chocolate, chocolate chip
Breakfast, Dessert, Snacks
Comment

Roasted Brussels Sprouts and Prosciutto Flatbread

January 31, 2017 by Haley Bell

The Super Bowl is this weekend, and I don't know about you, but I am always more excited for the food than the actual game. Pizza is usually a staple at most Super Bowl parties, so I decided to recreate a very easy and delicious version of it. This roasted Brussels sprouts and prosciutto flatbread recipe comes together so quickly and you can even assemble it ahead of time and pop into the oven at game time! When the Super Bowl has come and gone, this recipe also makes for the perfect appetizer, afternoon snack or dinner. 

I started by roasting the Brussels sprouts in the oven with a sprinkling of olive oil and salt and pepper. I roasted them at 350 degrees for about 35 minutes, until they were golden brown and crispy on the edges. You can either roast them right before you put them on the flatbread or you can do this step ahead of time. I also used store bought Naan bread which made it incredibly easy and was the perfect foundation for all the yummy toppings!

I lightly brushed some olive oil on the Naan and then I layered lots of yummy cheese on top. I used the quattro formaggio shredded cheese blend from Trader Joe's but you could also use shredded fontina cheese. The quattro formaggio cheese blend is my favorite whenever I make pizza. Lastly, I topped it with a few thin slices of prosciutto and the roasted Brussels sprouts. In only takes about 7-10 minutes in the oven until it's ready! 

Once the cheese has melted, and your kitchen smells amazing, it is time to remove it from the oven. Since the Naan bread isn't shaped into a perfect circle, I cut it into strips. You could also bake off a couple of these and cut them into smaller squares if you're feeding a crowd. 

When I tested out this recipe, I surprised my husband when he got home from work and he absolutely loved it! Needless to say, there was not a scrap leftover on our plates. I hope you give this recipe a try and love it as much as we do!


Roasted Brussels Sprouts & Prosciutto Flatbread Recipe

Ingredients:

  • 1 piece of Naan bread (I used this brand)
  • Olive oil for brushing
  • 1 cup quattro formaggio shredded cheese blend, or 1 cup shredded fontina cheese
  • 1 cup oven roasted brussels sprouts, halved
  • 2-3 thinly sliced pieces prosciutto, broken into bite sized pieces
  • salt and pepper to taste
  • red pepper flakes 

Directions:

  1. Preheat oven to 400 degrees.
  2. Brush the top of the Naan bread with olive oil.
  3. On a baking sheet, scatter the tops of the Naan with the cheese, Brussels sprouts and prosciutto. Place the baking sheet in the oven for 7-10 minutes until the cheese is melted.
  4. Remove from the oven and dust with red pepper flakes and salt and pepper. Slice on a bias and serve and enjoy!

*This recipe was adapted from this original recipe.

January 31, 2017 /Haley Bell
2 Comments

Lemon Chicken

January 18, 2017 by Haley Bell in Dinner, Lunch

As I sit here sipping warm lemon tea on a rainy afternoon, I am reminded of why this recipe came so easily to me. This season, in particular, I have been obsessed with citrus as well as getting healthy meals on the table. Through those series of events, I combined the two ideas and this incredibly easy, delicious and healthy lemon chicken recipe was born! It is packed with all of my favorite flavors and pairs well with just about any sides you serve it with. 

I know you might be thinking to yourself, "another chicken recipe, how good can it be?" I think when you choose a few high quality ingredients, "another chicken recipe" can be transformed. I absolutely love Meyer lemons, so I used them in this recipe and it gives this dish amazing flavor! 

I seasoned and seared both sides of the chicken breasts before I added the lemon and herb sauce to it. I then finished it in the oven. This allows the chicken to get a good sear while not drying it out.

To lock in all of the amazing flavors this dish has to offer, I spooned the mixture over the dish throughout the cooking time. This also helped keep the chicken juicy and tender.

LemonChicken-26.jpg

My husband and I have been making more of an effort to eat dinner at the dinner table instead of piecing a meal together in front of the TV. For some this may sound easy, while others it might be a struggle. With a very simple table setting, this was the perfect meal for my husband and I to enjoy together. Recipes like this allow you to get dinner on the table quickly so you can focus on what's really important. 

I made this recipe to serve for two since it was just my husband and I, but you could easily double or triple the recipe depending on how many mouths you need to feed! It also makes for amazing leftovers if you make a batch at the beginning of the week to enjoy throughout the week. I would love to hear how you enjoy this recipe, so be sure to let me know! :)


Lemon Chicken Recipe

Ingredients:

  • 2 boneless, skinless chicken breasts
  • 2 Tbs. butter 
  • 1/3 cup chicken broth
  • 3 Tbs. fresh Meyer lemon juice
  • 1 tsp. dried herbs 
  • 1/2 tsp. salt, additional for seasoning
  • 1/4 tsp. pepper, additional for seasoning
  • Dash of seasoning salt 

Directions:

  1. Preheat oven to 400 degrees.
  2. Melt butter in a medium cast iron skillet over medium-high heat. Add chicken and sprinkle with salt and pepper. Cook chicken 2-3 minutes per side, until browned but not cooked all the way through.
  3. In a separate bowl, combine the chicken broth, lemon juice, herbs, salt and pepper and seasoning salt.  Pour the sauce directly over the chicken in the pan. Bake for 20-30 minutes or until the chicken has cooked through. Spoon the sauce from the pan over the chicken every 5-10 minutes. 
  4. Garnish with fresh rosemary and lemon slices and enjoy! 
January 18, 2017 /Haley Bell
dinner, easy dinner, chicken, lemon, lemon chicken, rosemary, weeknight meal
Dinner, Lunch
Comment
  • Newer
  • Older